simple-fun-christmas-tree-craft-activities

2 easy and fun Christmas tree crafts #BostikBlogger

Halloween and Bonfire night are behind us.  The nights are drawing in.  Decorations and festive treats are filling up the shelves in town.

I think it’s about that time of year when we can safely start talking about Christmas.

Which is good because that is the theme for this month’s Bostik Bloggers craft activities!

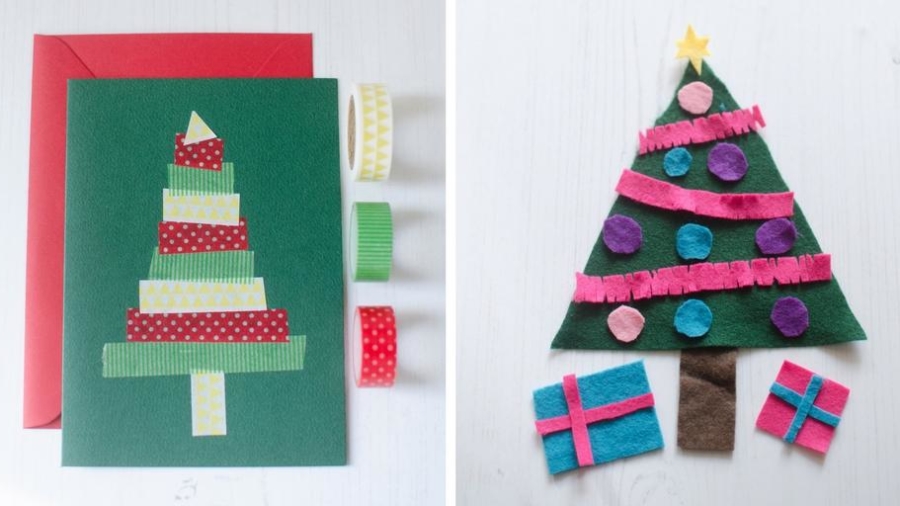
I’ve kept it simple and fun with two quick Christmas tree crafts – a super easy card idea and a festive felt activity that the children can play with again and again over the festive period.

2 easy and fun Christmas tree crafts


First up is the ridiculously easy Christmas tree card, perfect if you like to add the homemade touch to your Christmas greetings.

They are so quick you could easily make a whole pile of them in an evening in front of a festive film.


To make this super simple Christmas card, you just need 2 things:

  • A card blank (or just a piece of card folded in half)
  • Some washi tape

simple-washi-tape-christmas-tree-card

I’m almost ashamed to write this as a how-to because honestly it’s so easy.

But here’s what you do:

  • Cut a piece of tape to be the trunk of the tree, then stick it down.
  • Choose which order you’ll use your different tapes in, aim for an alternating pattern if you only have 2 or 3 rolls.
  • Cut a length of your first roll of tape and stick it down at the bottom of the tree.
  • Cut a slightly shorter length of your next roll and stick it down above the first piece.  You can overlap them slightly if you want to.
  • Keep on doing this, with slightly shorter pieces of tape each time until you complete your tree.

simple-washi-tape-christmas-tree-card-001

And that’s it!

So simple, but really effective don’t you think?

simple-washi-tape-christmas-tree-card-002

If you don’t have washi tape then you could cut strips of patterned paper out and stick them down with glue or double sided tape instead.


My second craft activity is this easy felt Christmas tree.

I made mine to be around A5 size, so that we can use it for a Christmas-themed busy bag.  I think it will be great to keep Nerys occupied if we have to sit and wait anywhere during the festive period.

Here’s what you need if you’d like to make one:

  • Pieces of felt in various colours, including brown and green for the tree.
  • Scissors

simple-felt-christmas-tree-craft-supplies

Here’s what you need to do:

  • Cut your green piece of felt into a Christmas tree shape.  I went for a very basic triangle for mine, but you could cut out a more fancy tree shape if you wanted to!
  • Cut a small rectangle of brown felt for the tree trunk.
  • Cut out some strips of felt, then snip into the sides, cutting out little pieces.  This will be your tinsel.
  • Cut out a little star to go at the top of the tree.
  • Cut out various shapes for your other decorations.  Again I kept mine really simple with little circles for baubles but you could get much more creative here.
  • Cut out some squares and rectangles for presents, and thin strips of felt for ribbon.

simple-felt-christmas-tree-craft-activity-decorations

Once you’ve cut out all the different pieces your child can have fun decorating their very own Christmas tree.

Who knows, it might keep them busy while you decorate the real tree this year!

simple-felt-christmas-tree-craft-activity

If you want to go one step further with this you could get some big sheets of felt and create a huge version to stick up on the wall for your child to decorate again and again.


So there you go, 2 Christmas tree crafts to start getting you in the Christmas spirit in next to no time!

Do you like to get crafty and creative at this time of year?  


I was sent a box of craft materials to create this post, but all words, opinions and creations are my own.

autumn-tree-pipe-cleaner-printing

Autumn tree printing with pipe cleaners #BostikBloggers

I love autumn.  And judging by the posts filling up my timelines on various social media channels, I’m not the only one!  There are a lot of people out there who are very happy that autumn has arrived, bringing with it cosy clothing, pumpkin spice everything and of course the beautiful changing colours of the leaves on the trees.

So when I realised the theme for this month’s bostik bloggers craft activity was ‘autumn’ I was thrilled!

I decided to get creative with Nerys and so we did some painting/printing with pipe cleaners to make this wonderfully colourful autumn tree.

Autumn tree printing with pipe cleaners


If you’d like to have a go yourself, here’s what you’ll need:

  • Paint – red, green and yellow
  • A sheet of paper
  • Paintbrush
  • Pipe cleaners

autumn tree painting pipe cleaners


The first thing you need to do is paint your tree trunk and a few branches.

I drew the tree outline first with pencil, rather than letting Nerys paint a tree freehand.  And we made some brown paint by mixing the red, green and yellow paints together.

Autumn tree printing with pipe cleaners

Once the tree was painted it was time to have some fun with the pipe cleaners!

I twisted the pipe cleaners in the middle to make a little loop, and then wrapped the ends around each other to make a handle of sorts to hold on to.

pipe cleaners autumn trees

Then we dipped the pipe cleaner loops in the paint and then used them to print leaves on to the tree.

We did green first, then red, orange and yellow.

Autumn tree printing with pipe cleaners

This is a really simple craft activity, but one that is so much fun and that sparks creativity with using things other than paintbrushes for mark making.  Nerys really enjoyed herself with this, and we both really love the end result!

autumn-colours-tree-printing-pipe-cleaners

I was sent a box of craft materials to create this post, but all words, opinions and creations are my own.

busy-bag-craft-felt-make-a-monster

Make a monster – felt busy bag activity #BostikBloggers

Every month we look forward to a lovely box of craft materials arriving at the house for us to get creative with as part of our roles as Bostik Bloggers.

The theme for September is ‘monsters’ which is perfect for this time of year with Halloween just around the corner.

I had a good look through the bits and pieces that we were sent and decided to create a ‘make a monster’ busy bag activity.

make-a-monster-felt-busy-bag-activity

When Rhys was a toddler I made him a whole pile of busy bags that we would take out and about with us.

They were perfect for keeping him occupied any time we had to sit and wait anywhere.  We took them with us on a trip to the Isle of Man when he was 2 and they kept him quiet for a good part of the long boat ride over.

I’ve not felt the need to use them so much with Nerys, but with 2 meetings at school this week that both children will have to sit through it seemed like a perfect time to create a new busy bag to try and keep them quiet.


If you fancy making this ‘make a monster’ busy bag for your children, here’s what you’ll need:

  • Card, cut to A5 size
  • Felt in assorted colours
  • Scissors
  • Glue

felt-monster-busy-bag

The first thing you need to do is cut a piece of felt to the same size as your card and then glue the two pieces together.

This will give you a nice sturdy felt ‘board’ for your children to assemble their monsters on.

Next, cut out a few monster body shapes.

I kept my monster bodies quite simple, but you can be as creative as you like with the shapes you cut out.  Just make sure they fit on the board you just made, with room around for arms and legs.

felt-monster-shapes-busy-bag

Once you’ve got a few bodies cut out, you can get really creative with cutting out features for your monsters.

Use whatever colour felt you like, to cut out shapes to be used for eyes, noses, mouths, teeth, arms, legs, and antennae.

felt-monster-craft-busy-bags

Now all that’s left to do is let your children start making monsters!

This is such a great activity for getting them using their imaginations.  If you cut up enough different pieces then there are so many potential monsters they could create!

felt-monsters-craft-busy-bags


This is a really great activity to pop in a little ziplock bag inside your handbag when you’re headed out somewhere with your children and you know you’ll need to keep them entertained for a while.

So if you know you’ll be sitting in a waiting room at the doctor’s or the dentist, then put this in your bag to give your children something to do while you all wait.

Do you use busy bags with your little ones?  If you do what is their favourite?

If you’ve not come across them before, then head over to Pinterest and search for busy bags, there are 100s of ideas on there to inspire you to get busy making some of your own!


I was sent a box of craft materials to create this post, but all words, opinions and creations are my own.

back-to-school-craft-felt-heart

Felt pocket heart – a simple back to school craft #BostikBloggers

If you have a little one heading off to school for the first time in September, or moving up to a new class and feeling nervous about it, then this craft is for you.

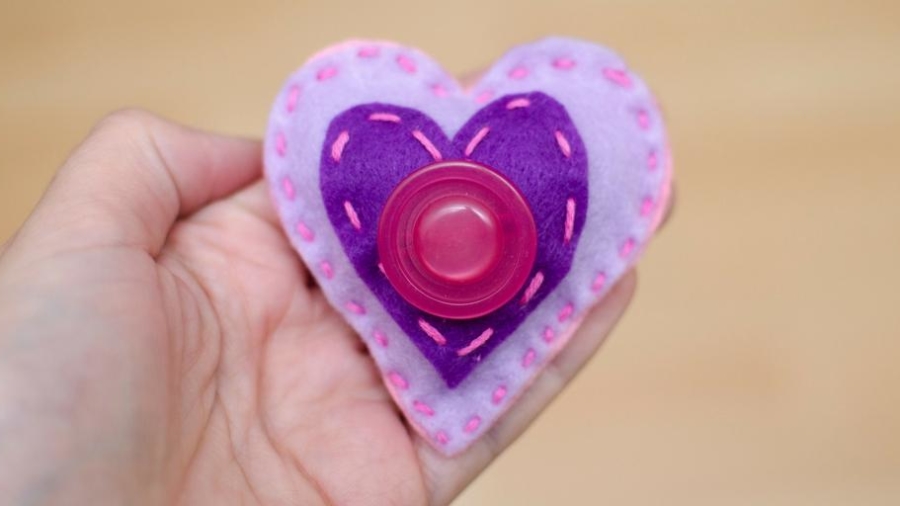
It’s a little felt heart, with a button on the front, to pop in their pocket.

The idea is that when they feel nervous or sad at school they can hold on to the heart and know that you’re thinking of them.

When I was little I had worry dolls, and even now I have a worry stone that I carry in my coat pocket.  I find having something to hold in my hand, to fiddle and ‘worry’ is really quite comforting.

So that’s why I put the little button on this heart, to act as a sort of worry stone.  

To be rubbed and twisted and fiddled with to help reduce anxiety.  I think this would be a really lovely way to bring some comfort to a nervous child as they head off to school in September.

felt-pocket-heart-back-to-school-craft

If you would like to make one yourself, here’s what you’ll need:

  • Felt
  • Scissors
  • Needle
  • Thread
  • A button

back-to-school-craft-felt-heart-what-you-need

The first thing you need to do is cut out your felt.

You want 2 hearts the same size, and one a little smaller.

I had a heart shaped cookie cutter that I used as a template for mine, but you can go freehand or find a template online to print out and use.

bostik-bloggers-back-to-school-craft


Next you need to sew the button on to the smaller heart.

Make sure that the button is sewn on really securely, because that is the part of the heart that is meant to be fiddled with and ‘worried’.

bostik-bloggers-back-to-school-craft


Next, sew the smaller heart on to one of the bigger hearts.

I just did a simple running stitch on mine, with pink embroidery thread to give a bit of contrast with the purple felt.

back-to-school-craft-bostik-blogger


The last step is to sew the 2 bigger hearts together.

Again, I just used a simple running stitch to do this, but if you’re a bit more adventurous then a blanket stitch would work really well for this stage too.

When you have sewn almost all the way round the heart stop and pop some stuffing inside.

I used some felt scraps in mine, which worked well.  If you have some dried lavender then pop some of that in too, to add a little relaxing scent to the heart.

Once it’s full, finish sewing the heart up.

heart-back-to-school-craft-bostik-bloggers

And there you have it.

A cute little heart to pop in your child’s pocket when they head off to school.

Something to give them a little comfort if they’re feeling sad during the day, and to fiddle with and ‘worry’ if they’re feeling anxious.

Why not make one for yourself too, to help you feel a bit better about your baby being at big school!

bostik-bloggers-heart-back-to-school-craft

I was sent a box of craft materials to create this post, but all words, opinions and creations are my own.

You Baby Me Mummy
bostik-blogger-creepy-crawlies-craft-learn-colours-rainbow

Creepy crawlies craft to help learn the colours of the rainbow #BostikBloggers

Nerys has been doing half days at school for a few months now, in what her school calls the Rising 3’s class.  It’s been amazing for her, and has really helped both of us adjust to the idea of her going into the nursery class in September.

She has gained a huge amount of confidence since starting, and she’s also learnt a fair bit too.

Her numbers are really coming on, and her knowledge of things like shapes and colours has come on in leaps and bounds too.

I want to keep the momentum going over the summer so I think we’ll be doing lots of craft activities that are built around practising her colours and numbers, and maybe some to help her start to learn letters too.

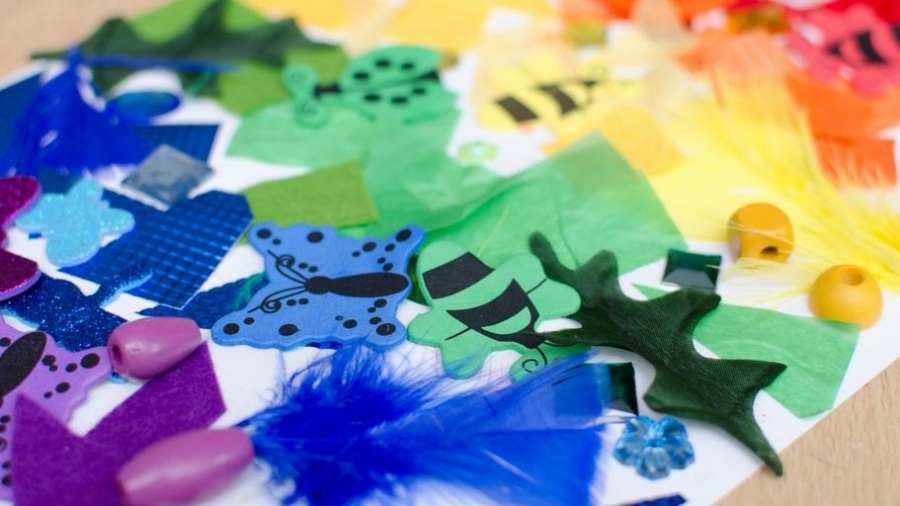
This simple and fun craft using coloured creepy crawly stickers is a great way to help little ones learn their colours.

creepy-crawlies-craft-learn-colours-rainbow

If you fancy giving this fun craft a go, here’s what you’ll need:

  • Foam creepy crawly stickers in different colours
  • Scraps of paper, beads, felt, feathers etc in the colours of the rainbow
  • A piece of white paper or card
  • Glue

creepy-crawly-craft-learn-colours-rainbow

First of all you need to gather all your bits and pieces together.

To make the most of this craft as a learning activity work with your child to put all the red materials together in a pile, then all the orange pieces, then the yellow and so on.  You can start by handing them a red ladybird sticker and then asking them to pick out all the other pieces that are the same colour.

Once all the coloured pieces are organised it’s time to get making!

Spread some glue over the piece of white paper or card, and then start sticking down the various red items you have in a line across the top.

Then do a line of orange, yellow, green, blue and purple.

creepy-crawlies-craft-learn-colours-rainbow

And there you have it, your bright and colourful rainbow, complete with creepy crawlies!

learn-colours-rainbow-creepy-crawlies-craft

Nerys and I had so much fun working on this creepy crawlies craft.

And I love how it was so simple to put together, but it helped her with learning colours, learning the order of the colours in a rainbow and with her fine motor skills too.  Nerys enjoyed it so much she asked to make another one as soon as we’d finished this one, so it’s bound to be a hit with any little ones who enjoy cutting and sticking activities!


I was sent a box of craft materials to create this post, but all words, opinions and creations are my own.

easy-ufo-craft

Easy UFO craft activity #BostikBloggers

Every month we wait eagerly to see what will arrive at our door for us to craft with as part of my role as a Bostik Blogger.

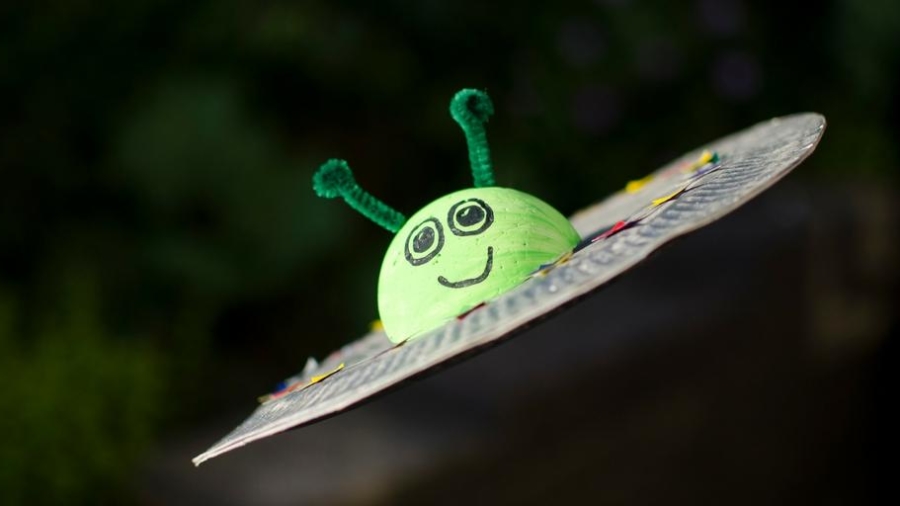
This month, the theme was ‘Space’ and we were sent some bits and pieces to get creative with.  After having a think, I decided it would be fun to make a UFO.

We had some paper plates left over from our bird craft the other month, and we’ve read a couple of stories recently about aliens and so I thought this would be fun for both Rhys and Nerys.

Easy UFO craft activity

Here’s what you need:

  • 2 paper plates
  • a polystyrene ball
  • a pipe cleaner
  • paint
  • thread
  • stickers or stick on jewels
  • glue

ufo-craft-what-you-need

The first thing you need to do is cut the polystyrene ball in half and paint one of the halves green.

Then paint the paper plates with silver paint.  If you don’t have silver paint you can pretty much use whatever colour you like, it’s your UFO after all!  You could also cover the plate in tissue paper if you’d rather.

ufo-craft-bostik

Next draw or paint some features onto the green ball, to make it look like a little alien’s face.  If you wanted you could stick googly eyes on instead of drawing them on.

Then cut 2 short bits of pipe cleaner and roll the ends up a little to make them look like antennae.  Then poke them into the top of the alien’s head!

easy-ufo-craft-bostik

Make a little hole in the middle of one of the plates.  Cut a length of thread and tie a little knot in one end.  Thread it through the hole you made in the plate, so that the knot will be on the inside when you glue the two plates together.

Glue the plates together to make the UFO, then glue the little alien head on top, just off centre.  With the head being off centre, you’ll need to counter balance the UFO so it hangs level.  I just used a couple of bits of blu tack for this, sticking them on the underside of the UFO.

Decorate the UFO with stickers or stick on jewels or little bits of coloured paper if that’s all you have.

simple-ufo-craft-activity

Hang up your UFO!

ufo-space-craft-activity-bostik

What do you think?

Would you be happy to get a visit from this little green man?!

spring-flower-craft-photo-frame

Simple crafts – flower photo frame #BostikBloggers

Everywhere we look at the moment there are flowers blooming.

Daisies and buttercups are everywhere.  And pretty soon the wildflower displays will be brightening up the whole of Swansea.

So it’s only fitting that this month’s craft theme for us Bostik Bloggers is ‘Flowers’.

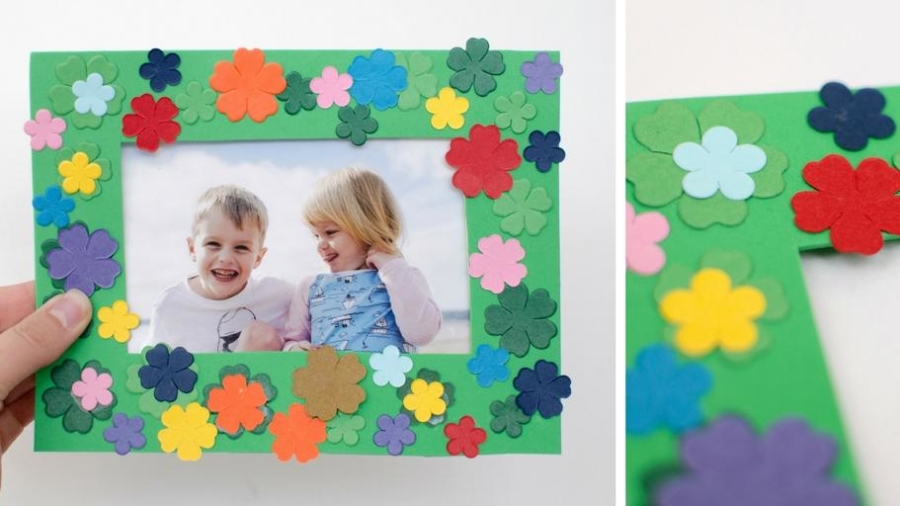
After taking a look at the crafty goodies we were sent, Nerys and I decided to make a fun and simple flower photo frame.

simple-flower-photo-frame

Here’s what we used:

  • A5 piece of green foam
  • Paper flowers, in different colours and sizes
  • Scissors
  • Glue

simple-flower-frame-what-you-need

The first thing I did was cut a rectangular hole in the middle of the foam, just a bit smaller than the photo we wanted to frame.

Then we got to work gluing the flowers down.  We stuck all the green ones down first because I wanted them to add some texture and depth to the frame, but to not be the main focus.

flower-frame-craft

Once we’d used all the green flowers we started adding all the bright and colourful ones.

I went for the approach of filling in gaps with these flowers, whereas Nerys chose to stick hers in the middle of some of the green ones.  I love how we both put our own stamp on this little craft!

Once all the glue had dried we stuck our photo to the back and we were done!

simple-craft-flower-frame

I really love how this turned out, and how simple it was to make.

We had some pre-cut flowers in our craft kit, but you can easily make them yourself by using a flower punch and whatever coloured or patterned paper you have at home.

When it came to putting the photo ‘in’ our frame, we just stuck it to the back with some tape.  But you could use photo corners if you’d rather.

Then you can stick it up at home with blu tack, or stick some little magnets on the back and pop it on your fridge!


I was sent a box of craft materials to create this post, but all words, opinions and creations are my own.

You Baby Me Mummy